Data Preparation: Image Classification
In this section we describe how to create a CSV file from trained image classification tasks, which can be uploaded into Metascatter. We provide scripts for standard classification model architectures (with user-provided weights) for:
You will only need to edit some configuration files to point to your data and model weights.
Tensorflow
Downloads
- Tensorflow classifcation CSV creation script: Download
- Template configuration file: Download
- Requirements file: Download
Usage: python create_csv_tf.py 'path_to_config_file.ini'
Quick Start
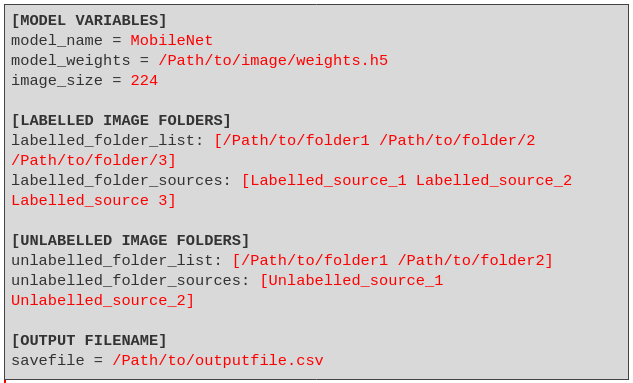
To create a CSV from a Tensorflow classification model, simply edit the variables in red in the template configuration file:

Prepare CSV file
We provide scripts to create a CSV file that works with metascatter, given image folders and models.
An example script for Tensorflow classification models can be downloaded here: Tensorflow Classification. You should not need to edit this file.
This requires the following Python3 libraries:
tensorflow==2.8.0
pillow>=9.1.0
pandas>=1.4.2
sklearn
The following models can be used, using either ImageNet or your own pre-trained weights:
MobileNet, MobiletNetV2
ResNet50, ResNet101V2, ResNet152V2, ResNet50V2
VGG16, VGG19
DenseNet121, DenseNet169, DenseNet201
EfficientNetB0, EfficientNetB7
EfficientNetV2L, EfficientNetV2M, EfficientNetV2S
InceptionV2, InceptionV3
You will need to supply a configuration file: Download Template Config File
Usage: python create_csv_tf.py 'path_to_config_file.ini'
The create_csv_tf.py script should not need to be changed. Edit the configuration file as below:
[MODEL VARIABLES]
model_name = MobileNet
model_weights = /Path/to/image/weights.h5
image_size = 224
Please provide one of the models listed above and a path to the trained model weights. Also include the height/width of the images needed by the model (default 224).
[LABELLED IMAGE FOLDERS]
labelled_folder_list: [/Path/to/folder1 /Path/to/folder/2 /Path/to/folder/3]
labelled_folder_sources: [Labelled_source_1 Labelled_source_2 Labelled_source 3]
# Images should be arranged in folders according to class:
#    Folder->Class->Image.
# For multiple locations, please separate folders and sources by a space.
Inlcude a list of folders which store the labelled images you want to use. The folder structure of each image should be in Tensorflow classification format:
├── Image folder:
|   ├── Class 1 Folder:
|   |   ├── Image1.png
|   |   ├── Image2.png
|   |   └── Image3.png
|   ├── Class 2 Folder:
|   |   ├── Image4.png
|   |   └── Image5.png
You can provide several folders, e.g. if you have different folders for TRAINING, TESTING and VALIDATION images. You can reference these by entereding a corresponding name in the field labelled_folder_sources. Please ensure there are the same number of source names as folders provided. The folders and names should be separated by a space.
[UNLABELLED IMAGE FOLDERS]
unlabelled_folder_list: [/Path/to/folder1 /Path/to/folder2]
unlabelled_folder_sources: [Unlabelled_source_1 Unlabelled_source_2]
# Unordered image folder structure: Folder->Image.
# For multiple locations, please separate folders and sources by a space.
Similarly, you can include one or many folders for unlabelled data. Leave blank if there are no such folders. The structure of these folders should be:
├── Image Folder:
|   ├── Image1.png
|   ├── Image2.png
|   └── Image3.png
Finally, enter the filename and path of the output csv file.
[OUTPUT FILENAME]
savefile = /Path/to/outputfile.csv
This works with standard architectures of the models named above with either ImageNet or retrained weights. For bespoke architectures, please see Data Preparation.
PyTorch
Downloads
- PyTorch classifcation CSV creation script: Download
- Template configuration file: Download
- Template transforms file: Download
- Requirements file: Download
Usage: python create_csv_torch.py 'path_to_config_file.ini'
Quick Start
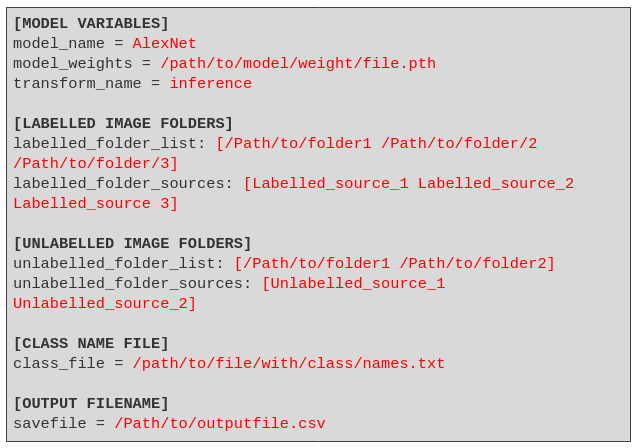
To create a CSV from a Pytorch classification model, simply edit the variables in red in the template configuration file:

Prepare CSV file
We provide scripts to create a CSV file that works with metascatter, given image folders and models.
An example script for PyTorch classifcation models can be downloaded here: PyTorch script download. You should not ordinarily need to edit this file.
The following Python3 libraries are required:
torch
torchvision
pillow>=9.1.0
pandas>=1.4.2
sklearn
umap-learn
The following models can be used with your own trained weights:
AlexNet, ResNet18, VGG16, SqueezeNet, DenseNet161, InceptionV3, GoogleNet, MobileNetV2, MobileNetV3L, MobileNetV3S
You will need to supply a configuration file and a file describing the transforms for inference, for which templates can be found below:
Usage: python create_csv_torch.py 'path_to_config_file.ini'
The create_csv_torch.py script should not be changed. Edit the configuration file as below.
[MODEL VARIABLES]
model_name = AlexNet
model_weights = /path/to/model/weight/file.pth
transform_name = inference
# Should correspond to transforms_config.py
Please use one of the standard model architectures listed above and provide the path to your trained weights. The transform_name field should correspond to the name given in transforms_config.py.
[LABELLED IMAGE FOLDERS]
labelled_folder_list: [/path/to/folder/of/labelled/images/1/ /path/to/folder/of/labelled/images/2/ /path/to/folder/of/labelled/images/3/]
labelled_folder_sources: [Name_of_source_of_folder_1 Name_of_source_of_folder_2 Name_of_source_of_folder_3]
# Images should be arranged in folders according to class:
# Folder->Class->Image. For multiple locations, please separate
# folders and sources by a space.
Inlcude a list of folders which store the labelled images you want to use. The folder structure of each image should be in the following class format:
├── Image folder:
|   ├── Class 1 Folder:
|   |   ├── Image1.png
|   |   ├── Image2.png
|   |   └── Image3.png
|   ├── Class 2 Folder:
|   |   ├── Image4.png
|   |   └── Image5.png
You can provide several folders, e.g. if you have different folders for TRAINING, TESTING and VALIDATION images. You can reference these by entering a corresponding name in the field labelled_folder_sources. Please ensure there are the same number of source names as folders provided. The folders and names should be separated by a space.
[UNLABELLED IMAGE FOLDERS]
unlabelled_folder_list: [/Path/to/folder1 /Path/to/folder2]
unlabelled_folder_sources: [Unlabelled_source_1 Unlabelled_source_2]
# Unordered image folder structure: Folder->Image.
# For multiple locations, please separate folders and sources by a space.
Similarly, you can include one or many folders for unlabelled data. Leave blank if there are no such folders. As there are no classes, the structure of these folders should be:
├── Image Folder:
|   ├── Image1.png
|   ├── Image2.png
|   └── Image3.png
In order to output class names (instead of numbers) to the CSV, you will need to provide a class list file.
[CLASS NAME FILE]
class_file = /path/to/file/with/class/names.txt
The list of classes should be in order corresponding to the output of the model:
Class0
Class1
Class2
...
ClassN
Finally, enter the filename and path of the output csv file.
[OUTPUT FILENAME]
savefile = /Path/to/outputfile.csv
This works with standard architectures of the models named above with either ImageNet or retrained weights. For bespoke architectures, please see Data Preparation.